braising

Braised Chicken

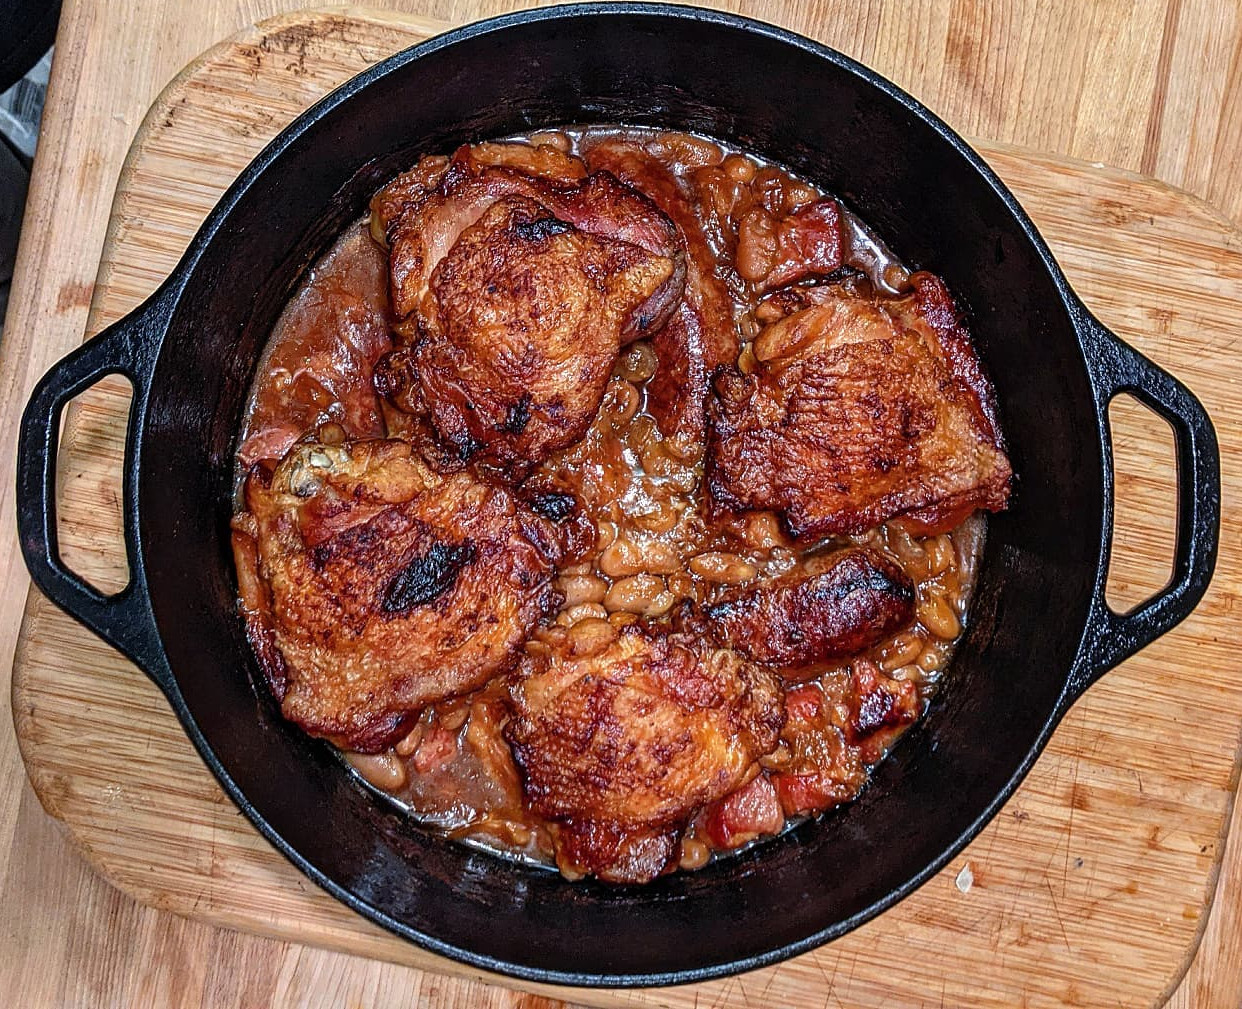
Over the years, I’ve come to appreciate the subtleties of braising, but I frequently run across people who are confused about what, exactly, braising is – and for many years, so was I. What is the common description of braising? “meat cooked slow in liquid”. But what does that mean? Is cooking meat in liquid slow in a pot on the oven braising? (spoiler: no) Is slow-cooking meat in liquid in a pot in the oven braising? (spoiler: also no, mostly). A quick explanation of my understanding of what braising is, why you should do it, and how it’s superior to some other methods. If you want the quick tl;dr: braising is only braising when there’s convection involved. Explanation below:

First, a brief overview of heat transfer. There are three main methods of heat transfer: conduction, radiation, and convection. (There’s also advection but that is not relevant here.) When you put a pan on a hot electric burner, that’s conduction. When you put a piece of bread in a toaster, that’s (mostly) radiation. When you put a pot in a hot oven, that’s (mostly) convection. Radiation happens in a hot oven somewhat, but for the purposes of this discussion, we can ignore it.

Let’s talk about the effects of conduction and convection at play in the context of a pot of liquid and meat.

If you put such a pot on an electric burner, you have heat transfer of:

electric coil (by way of conduction) ->
metal pot (by way of conduction) ->
liquid -> (by way of conduction not convection, since the fluid is not moving much) ->
meat

If you put such a pot into a hot oven, you have heat transfer of:

electric coils (by way of conduction) ->
air (by way of convection) ->
metal pot (by way of conduction) ->
liquid (by way of conduction) ->
meat

So, in the context of cooking a pot of liquid and meat on a stovetop burner with the lid on, the heat comes mostly from the bottom and heats everything up, and whatever air is in the pot is not doing much, and most moisture is retained. If you take the lid off, evaporation will happen slowly, reducing the liquid. This is not braising (no convection).

If you take that same pot and put it in a hot oven with a lid on, we’re getting closer to braising, because in a hot oven we have the forces of convection in play (will explain why this is important momentarily). The pot itself is being heated by all sides by convection in the oven, and there’s some convection happening with the air inside the pot. But there are a few nuances before we get to Actual Braising:

  1. You often hear that when braising, the meat should only be partially submerged in the liquid, whereas if it were totally submerged you’re essentially just boiling/simmering it. Why does this matter? The Maillard Reaction. Convection via the air induces the maillard effect on the surface exposed to the hot air. Sure, you could crank the temperature up, but then you’d lose the effects of slow-cooking your meat for the purposes of rendering fat and connective tissue. (Note: there’s a common myth that maillard reaction only happens at high temp – that’s not true, it just happens faster.) You want your meat itself to be exposed to hot circulating air. So, in short, if the meat is not exposed and being vigorously heated by convection, it isn’t braising.
  2. The choice of pot matters. You can use any old pot and it’ll be Okay, but the dutch oven or a braiser is a common choice for a reason: they have much higher thermal mass for heat retention, meaning that you get a lot of heat getting piped in, both via conduction from the bottom/sides and convection via the air on top. (This heat retention is also important for searing, sauteeing, deglazing, etc, which is often a preliminary step to braising.)
  3. It’s often advisable to crack the lid, because then you still get the convection happening, but also evaporation can help reduce the liquid (with added help from the convection).

Cassoulet is a great example that demonstrates the utility of this effect – traditional cassoulet is made in a pot with a very wide top, maximizing the surface area to circulating air in the oven, so that the liquid slowly reduces and forms a film of collagen and maillard-browned beans/meat, and you occasionally break this film so more liquid pools on top and this process repeats until you have an incredibly silky/rich liquid.

In short, this is why e.g. beef stew made in a crockpot/pressure cooker or on a stovetop will simply never be as good as slow braised beef stew. (It’s totally understandable to take shortcuts for convenience, I get it.)

I wrote this up because I could have sworn seriouseats had a comprehensive article on this very thing. I surely didn’t get it as right as they would have (or maybe did), but they have a few articles I drew from that touch on these topics, albeitly obliquely:

Happy braising!

cooking tips

Intro

This is just a quick list off the top of my head of various tips, tricks, opinions, hot takes, and light trolling. This isn’t a comprehensive list or anything, just things I’ve encountered along the years that help me out with the stuff I tend to cook. There’s nothing in here that will be a shock to even a noob home chef, but you never know. I still run across things that blow my mind like “omg why have I not been doing this all these years???”

I figured I need a place to dump this stuff and can add to it as I think of things. I might update it with links, but probably not. You can just google anything I’m saying to see if I’m being a lying liar or not. Enjoy!

Gear

  • The list of pots/pans/etc you require is highly individual based on taste and what you’d like to cook. I don’t recommend buying a big set that has everything in it. You’ll necessarily compromise on quality unless you spend a fortune, and you’ll inevitably wind up with stuff you don’t use. Buy things a piece at a time, learn to like and use it. That said, the essentials for me:
    • Big cast iron skillet. You cannot beat the heat retention of a big hunk of metal when it comes to searing.
    • A large stainless saucepan – IME shelling out for all-clad is worth it here.
    • Stainless skillet (I could probably get away without this, but I have it)
    • Large/wide stainless saute pan
    • Dutch oven – enameled is fine, if you want it (see below). I just have cast iron
    • Large stock pot (I have a 19 quart stainless). Don’t skimp here, cus even though it seems like any thin metal piece of junk would get the job done (and it will), they are prone to failure at the weld between the bottom sides, and that failure mode tends to happen at heat, resulting in a leak at the bottom, which can really suck.
    • A large vitreous glass enameled casserole dish (see below for specific rec)
    • A wok (I am listing this despite never using mine, because sadly I haven’t had a good gas range in years, but :soon:)
    • A small non-stick skillet for eggs et al. I resisted non-stick for a long time. I held the (somewhat justified) stigma that non-stock skillets are silly and any well-seasoned pan is good enough, which is (mostly) true. But I’ve come around to the convenience. It’s really nice in the morning to make some quick eggs in a pan where you know you can give approximately zero fucks. Cleanup is a breeze. Get one that is cheap, replace it when the coating starts to go. I got a slightly pricier one that had a heftier stainless base for better heat retention, but not so expensive it’s not still basically disposable.
  • A $40 (or whatever) Victorinox chef’s knife is more knife than pretty much any home chef will ever need.
  • If your knives seem dull, you probably don’t actually need to sharpen them, you just need to hone them. Get a good honing steel or a strop. I have a ceramic steel that is fine, though they are brittle.
  • Buy an immersion blender. I see the need some people have for an actual blender, but I’ve never needed one.
  • Buy a sousvide stick. It might sound pretentious but it’s a gamechanger. It’s also immensely useful for defrosting. No more overnight waits for your ribeye to thaw.
  • Buy heat-resistent silicone tools whenever possible. Silicone mixing bowls are amazing for mixing, deforming to pour, quick rinse out to clean cus they are nonstick. Silicone sauce brush makes cleanup a breeze. Flexible silicone cutting boards are great – mince garlic, fold cutting board, dump into pot. No more awkward scraping and piling up on the back of the knife over and over. Measuring cup containers like this see daily use in my kitchen.
  • Enameled cast iron is overrated. Yeah, I said it. The only plausible reason you might want one is that a white enamel coating can make evaluating the color of a pan sauce much easier.
  • Vitreous glass enameled casserole dishes are great, on the other hand. I like Staub’s stuff, not as expensive as Le Creuset.
  • Get an instant read probe thermometer. Thermapens are great, cheaper knockoffs are probably fine. Seriouseats has reviews. When it comes to cooking any meat, temperature is key. Stop eyeballing and guessing and just get a good probe.
  • Get an infrared point-and-shoot thermometer – great for quickly checking the temperature of a heating pan, or calibrating your oven.
  • Instantpots are great, but unless you absolutely prioritize the convenience, it’s no substitute for proper braising and slow-cooking.
  • Get a garbage bowl and a bench scraper. I myself still haven’t done this, but I know I need to.
  • Buy an egg cooker for soft/hard-boiling eggs. I know, I know, softboiling eggs is not exactly brain surgery. I’m not big on kitchen gadgets, but I pulled the trigger on one and it was a gamechanger. I make at least one softboiled egg for breakfast every single day. It makes softboiled eggs a trivially easy upgrade to dress up ramen.
  • Get a boning knife. I got the cheap Victorinox one and it was a gamechanger for taking apart a chicken. For years I just thought I was bad at it.

Techniques

  • For quickly peeling garlic, separate all the cloves, place them under the side of a knifeblade and gently wack it with your palm. This will (usually) smash it free of the peel. For subsequently dicing the garlic, do the same thing except harder to smash the garlic on the cutting board, then finish with a dice.
  • Alternatively, just buy peeled garlic. It’s fine.
  • Soup and stew level-up: Once you’re more or less at the “let it stew for a while” stage, take a cup of the soup/stew, try to get a little bit of everything in that one cup (including meat!). blend it thoroughly with an immersion blender and fold it back in. It can help thicken, depending on ingredients, and also kinda dissipates the general flavor notes of the soup.
  • Don’t worry about meat sticking. Don’t panic, don’t turn down the heat. As the proteins denature they will slowly start to decouple from the metal of the pan. Any leftover bits leftover form the fond and are Actually Good.
  • ABD – Always Be Deglazing. You don’t need to have wine, you can just use stock. You can also just use water.
  • When making soups or stews that involve a long/slow/low cook time and involve meat, cook the meat as desired and then set aside when possible. Add it back at the end. If you are braising shortribs for chili, braise them first alone, make your chili base, let it stew to come together, add the rib meat back at the end. If you’re searing chicken thighs for e.g. curry, sear it, remove, deglaze, make your curry base and re-add the meat at the end letting them finish cooking. Meat when cooked too long (even braised) will start to get dried out as all the delicious rendered fat and collagen goes away.
  • Your pan isn’t hot enough.
  • When braising, feel free to crack the lid to encourage reduction.
  • Letting meat come to room temperature before searing is a myth, but salting to remove moisture is not, so do it anyway with liberal application of salt, then pat it dry.
  • Learn not to fear your broiler. A good broiler is indispensible for when you want to maillard up things or flash roast a pan of veggies.
  • Skim recipes, don’t scrutinize them. Learn to take apart a recipe, scrapping it for parts. This will help you build intuition for improvizing vs following a (probably flawed or overly-meticulous) set of instructions.
  • Watch and read Julia Child and Jacques Pepin. Just do it.

Recipes/Ingredients

  • Be wary of recipes calling to skim/remove all the fat. Straightup huge volumes of grease are gross, sure, but fat is flavor. The anti-fat crusades still live on, despite being hogwash, so be vigilante. Stay strong.
  • If you are sousvideing in a marinade or rub, be sparing .. in sousvide context a little goes a long way. I once overnight sousvided a chuckroast with a marinade that had a TINY bit of apple cider vinegar. The entire roast even to the very core tasted like vinegar. Not great, bob.
  • MSG is good, use it. The migraine connection is a myth
  • Fish sauce goes in anything and it won’t make the dish fishy. Use it for umami.
  • Brewed coffee is a good source of umami. If you have some leftover laying around, use it.
  • Quality of eggs can matter for appearance, nutrition, size of yolk, etc, but all eggs taste the same. I know, I know, your free range chickens’ eggs just taste so much better! They don’t. Repeated blind taste studies have repeatedly debunked this. No one can tell. They probably are better for you, though!
  • Level up your coleslaw with thin-sliced white onion and green apples.
  • Don’t put tomatoes in chili. It’s called ‘chili’ for god’s sake.
  • Learn to make a basic chile colorado. It will help you start to appreciate the depth and breadth of various chile flavors and it’s the base technique for any subsequent chili.
  • Braise shortribs or oxtail for chili instead of just ground beef or even braised chuck. You’ll thank me.
  • Put beans in chili. I am not taking questions at this time.
  • takes a deep breath Onions take a long time to caramelize. The recipe saying otherwise is a liar.
  • If you want to roast a chicken, spatchcock it. Good fast method and you get a free backbone to put in the freezer for stock.
  • When you have enough freezer backlog of chicken parts, make your own chicken stock. It’s easy. It smells good.
  • Reduce your chicken stock till it’s basically solid gelatin at room temp. Freeze in silicone ice-cube trays.
  • Similarly, you can make roux in large batches and freeze in ice-cube trays as well.
  • Pork loin is not pork tenderloin. Say it again. If I see one more person out there makin “pulled pork” with pork tenderloin I’m gonna cry.
  • Do you have a large pork loin around? Here’s a good and quick recipe: throw it in the trash.
  • Grocery store-bought pork can be cooked/eaten med-rare/rare. Trichinosis has been a solved problem in the hog industry for decades. (But not, apparently when it comes to bear meat!) It can also still be a problem with pasture-raised pork from smaller farms, where you can’t guarantee one of them didn’t eat a dead mouse or something.
  • Frozen seafood like shrimp and scallops can be great to quickly add to a curry. e.g. make, say, a red thai curry base. Toss in frozen shrimp at the end, let them cook, eat. This has the advantage that you can just serve it when the shrimp is perfectly cooked, so it doesn’t dry out or get rubbery.
  • Mustard is a good way to punch up the perceived heat of a spicey dish without raising the actual heat. Mustard helps carry the smells to your nose and is a great combo with chile spice.
  • American cheese is good, actually
  • Sliced scallions freeze very well in a ziplock bag for quick cooking and garnishing.
  • If you’re making a larger hamburger patty (e.g. not smashburgers), make the patties thinner in the middle, like almost a donut. It will contract on cooking resulting in a better flat patty. No more football burgers.
  • Making mushroom risotto? Dehydrated mushrooms are perfect for this. Rehydrate in simmering water, remove, chop/whatever, and use that resulting mushroom water to make the risotto. It’s free real estate mushroom flavor!
  • Risotto requires time and stirring. If you’re taking shortcuts that’s fine, but it’s not risotto, you just made rice.
  • The ribeye cap is the best part of the ribeye. “Can you just ask a butcher to cut you just the cap?” you ask? Yes, yes you can.
  • In making any kind of soup involving corn (e.g. chowder), cutting it off the cob, scraping the bits/juice of cob into a cheesecloth and pressing out the juice to use in the soup is a) a totally messy pain in the ass and b) absolutely worth it.
  • Almost any recipe involving chicken is better with chicken thighs than chicken breasts.
  • A thin layer of mayo on any bread you’re toasting/grilling will help it brown.
  • Liver is mindblowing medium-rare. Put the overcooked shoe-leather liver of your childhood out of your head and try it again. It’s good.
  • Salt and drain eggplant to get rid of excess water and any bitterness.
  • Learn to make bechamel (and all the mother sauces, really, but definitely bechamel). It’s the easiest and you can use it everywhere.
  • Any recipe calling for milk or cream (e.g., say, a chicken pot pie, or a creamy casserole) can usually be improved by making it with bechamel.
  • Drain every bit of moisture in wilted spinach you possibly can before using it in something (e.g. lasagna, creamed spinach, etc)
  • Creamed spinach is good, but bechameled spinach is better (see above)
  • I sear meat in butter (usually). I know of literally no science explaining why it would, but nonetheless it seems to help things brown better. Science would say it does nothing but burn. Maybe there’s just enough lactose in butter that it helps? Lactose is a sugar, maillard reaction requires sugar. I dunno. Maybe I’m just stupid.
  • Put a little water or milk in your scrambled eggs if you’re cooking them hot and fast. Puffs em up a bit.
  • Onions are good. Shallots are better.
  • Peeling roasted peppers is a pain in the ass – but if you roast them and then immediately seal in a paper bag (even a ziploc bag seems to work) while they cool, the skin becomes much easier to remove. Not sure why, something sciencey to do with the evaporating moisture I bet.
  • Make (and freeze!) chimichurri. It’s so good! I slept on it for far too long.
  • Grilling corn: unless you’re doing it elotes style (where you want charring on the kernels themselves), soak the corn still in its husk in water, finish on hot grill. The water in the soaked husks steams the corn inside and once it finally starts charring a bit, imparts a pleasant smokey flavor.
  • Greens of most vegetables are edible, even if you don’t think of em that way. If you get beets, wash and wilt the greens! They’re great!
  • Add more cumin. More. No, more.

jira is bad

Intro

Disclaimer: I am not a project manager. I’m a devops/SRE/security type guy. I could barely explain to you the difference between “agile” and “waterfall” (in practice, anyway). These opinions come from someone that has spent 20 some odd years using every manner of PM tool under the sun in some capacity – whether as a manager, a developer, an engineer, or all of the above. This is not a solution or a manifesto (I think). It’s ungenerous, a complaint, an airing of grievances and a summary of my PTJD (Post Traumatic Jira Disorder). So, let’s get into it:

Jira

Jira is an issue tracking, bug management and project management tool. Doesn’t sound so bad, does it? But, many people hate Jira. Some people (me) loathe it with the fire of a thousand suns. I won’t get into the nitpicky reasons that a lot of people cite for disliking Jira: lack of certain features, things implemented poorly, the choice of Java, etc. These are all valid, but they are points of contention you’ll always have with such software. Debates around the merits of various PM tools have existed since the dawn of software engineering and will never go away.

Here are some links to such critiques:

Instead, I want to talk more about the Jira mindset as it pertains to project management specifically, and how it affects organizations. Jira has other functionality which is “fine” but not at the root of the problem. I will quote part of the top comment on a hackernews post about one of the above articles that I think gets into the meat of it:

To me, what sucks about JIRA (and would suck about any well-designed tool that replaces it) is not “feature x” but the entire JIRA mentality. All of it. It encourages micro-management. It encourages more and more process. It is the enemy of getting better at the DORA metrics, which requires streamlining process. tickets in JIRA are not the work itself, never was and never will be, it is a LARP of the work, but it gets taken for the central thing. This is an illusion. Fixing a bug without filing a JIRA ticket is in itself progress. Moving a JIRA card without any other change is not. Yet the second is what’s visible and therefor what’s rewarded. Any problem gets solved with “more JIRA “ which stops working when the remaining problems are caused by too much JIRA. And yet they keep trying, because it gives “control”. JIRA is a like metastatic tumour that will grow until it kills the host.

Project Management

Let’s say you’re writing some software. You’ve got a handful of developers and a sourcecode repository and everything is going swimmingly. One day, you add a few more developers and find your team getting confused. There’s no consensus on what “we” should be working on as a whole, or individually. You need Project Management! In its simplest form this can be accomplished trivially with a spreadsheet or even sticky notes on a wall in various categories, much like a basic TODO list:

TODO -> Doing -> Done

You assign things to people, move cards around to reflect reality, and everything is peachy. This is basically what Trello is in digital form, and what github issues nabbed for its PM tool as well.

Customization

What happens next is not surprising: A simple workflow is great, but sometimes you want more info. What if I want a category to reflect “things we were doing but temporarily stopped, so they technically go back into TODO but really are more important”, i.e. a “Backburner” status. What if you could “tag” things with metadata? What if you could “group” these todo items into discrete projects somehow. Jira (and many other tools, including trello, to some extent!) chose to support this by adding a powerful and deep ability to customize nearly everything. This affords you a lot of flexibility in creating a workflow in Jira to reflect nearly any internal process. Workflows from the simplest small agile development team to the biggest, most complicated NASA-level complexity waterfall process you can imagine (who, to be honest, might genuinely need something as customizable as Jira). Great, right? But now you find yourself and the other developers spending a non-zero amount of time futzing with your PM software workflow.

Enter the Project Manager

Almost every company has one or more Project Manager employees. Some are good, some are bad. Some are technical leads, some are not. Sometimes it’s the developers themselves, but at the end of the day, if you’re using a PM tool, someone is “managing” it. A necessary evil, perhaps, but updating, organizing and refining workflows is what we all do to some degree when using a PM tool, and it comprises some portion of your time at work. A friend of mine was fond of focusing on the difference between “working at the job” (i.e. doing your core competency that you were hired for) vs “working on the job” (i.e. time spent on non-core-competency things: checking email, meetings, etc. and of course project management). “Working on the job” is always gonna happen, but obviously you want to minimize it, and this includes time spent in and on project management related stuff. I continue to use the second-person pronoun “You” here to refer to a “project manager” because we’re all project managers one way or another and this is not an us-vs-them screed.

Jira Enables and Encourages Complexity

The fact that Jira can be infinitely customized makes it very tempting for a project manager to use it to track the “on the ground” reality of what people are working on. You tweak the workflow endlessly. You refactor it from scratch to reflect the Shiny New Workflow you imagined in the shower that morning that will make things much better. It feels good. You’ve got the solution that finally will let everyone update and observe the reality of a project’s progress. You start to get a small rush from finding a new way to tweak the workflow. The problem is that a complex/complicated process that you create is often not scrutable to others because, well, they didn’t make it and aren’t intimately familiar with it. Anyone who has spent a lot of time making complicated spreadsheets is probably familiar with this. You spend 2 days making a super-awesome spreadsheet and show it off to your coworkers and get blank stares and yawns because it’s complicated and they have shit to do.

The Dopamine Hit

Despite my aversion to Jira, over the years, I’ve tried to suck it up and use it. I’ve really tried. I remember one particular job using Jira extensively, where I had boards and issue backlogs from years prior (before I was even an employee) that hadn’t been updated in years and no longer reflected entire projects still in progress (and not), much less individual issues. “I’m gonna clean this up,” I thought to myself. And I did. I spent three days burning through coffee and re-familiarizing myself with Jira itself, this company’s workflow itself, and updating, closing, archiving, creating issues, etc. I even created a new element of the workflow! Because of course I did! I finally finished and everything was clean and up to date. It felt good. I got a little hit of that dopamine rush from a job well done. That’s when it hit me: I just spent three days doing … nothing. I was hired to do devops and SRE, and I instead spent this time getting our PM tool up to date with a “reality” that was gonna change as soon as I close the tab. We have Actual Problems as far as the eye can see. “What am I doing with my life??”

what do you do here

The (Worst Case) Result

You find yourself with one (or more) Project Manager who is enthusiastic about Jira and loves updating it.

You are harangued regularly by the PM for not updating your issues.

You feel guilty and stressed about not doing it.

The PM feels annoyed and resentful because you aren’t using the tool and the awesome workflow.

You start attending regular meetings with the entire team to review and update Jira because despite your best intentions Jira no longer reflects reality.

The PM finds themselves exporting data from Jira into spreadsheets because Management is asking for a coherent/simple progress report and, God help you, you can’t really figure out how to actually do that with your super awesome complicated workflow in Jira itself. (True story)

You take a look back at where you’re spending your time and realize, with horror, you spend more time in meetings and Jira than doing your actual job.

You find yourself hating your job.

Conclusion

None of these problems are, themselves, unique to Jira, and I realize that. It’s possible I’m being unfair. But Jira, in my opinion, uniquely enables and encourages this dysfunction. Goodhart’s Law is best summarized as “When a measure becomes a target, it ceases to be a good measure.” Jira, by way of its infinite customization and complexity enables measurement as the target instead of what it should be: getting the damn job done and shipping.

So what better options are there? It’s a hard problem. KISS (Keep It Simple Stupid) is a good guiding rule for many things, including this. The best PM workflow I ever had at any company was as simple as Trello with some webhooks to cross-post updates in/out of slack. Simple, efficient, legible. Github Issues is similarly simple (so far) and has the benefit of tight integration with pull requests and the codebase itself. This is good.

If an organization finds itself with one FTE whose entire job can fairly be summarized as “working in Jira”, you’re in bad shape. The cancer has taken hold and will start metastasizing. Cut the tumor out before it’s too late!

focal reducers

A few years ago, I ran across an ad for a product: a “speed booster” lens adapter that promised to increase the ‘speed’ (effective light-gathering normally associated with the maximum aperture of the lens) by up to 1 full stop. A popular example is the Metabones adapter for various cameras/lenses. It sounded, at first, like a scam. “How can you change the fundamental limits of a lens to be .. better? You can’t, it makes no sense.” I blew it off and moved on. It wasn’t till I got into astrophotography that I started hearing talk of similar devices: “focal reducers”, which increased the effective field-of-view (of a lens or telescope) and also gave a similar “speed” boost. Again, I was confused – how is this possible? I couldn’t blow it off this time (turns out they are fairly important for astrophotography), so I did some learnin’ – turns out it’s not a scam! It’s a real thing, and here’s how it works:

First a quick review of a basic lens. This is a basic diagram of a converging lens from wikipedia:

simple converging lens

Where the rays of light converge at the focal point, the result is, of course, a circle of light – the size of which depends on the lens design. Specifically, it depends on what sort of camera the lens is designed to work with: how large the sensor (or film plate) is and how far away from the lens it is. This circle is not perfect, of course – light falls off gradually due to diffraction around the non-optical parts of the camera and lens (this, incidentally, is what causes vignetting, at least when it’s not being applied digitally by instagram). The result is something like this, with a rectangle representing the sensor the image circle is actually projected on:

image circle

With a well-coupled lens and camera, there’s not much wasted light: the chosen rectangle of the sensor or film generally extends to the border of the light circle for the largest image possible without excessive vignetting in the corners. But! There are a lot of cameras and lenses out there – and now more than ever. In the world of digital, cameras are getting smaller and lighter – sometimes with reductions in the size of the actual sensor. You may be familiar with the term “crop sensor” – a broad term for a variety of sensor sizes that are smaller than the standard 35mm film/sensor plane (e.g. APS-C). They are generally called “crop” sensors because they are smaller rectangles and, when used with a lens designed for a full 35mm frame, they effectively “crop” a smaller portion of the image. Naturally manufacturers also design lenses to match these smaller sensors, but people of course want to still be able to use their old lenses. So, often the result, when you use a lens designed for a full frame sensor with a smaller sensor, is a light circle projection like this:

image circle with various sensors

Note that there’s a lot of light being converged by the lense that is effectively “wasted” because it’s outside the bounds of the sensor being used in the cases of the APS-C and 4/3” sensors. This part of the image circle projected by the lens falls not on the sensor, but on the back/sides of the camera, never to be seen again. This is where the voodoo comes in. If, say, you’re using a Canon EF 200mm lens (designed for a 35mm sensor) on your fancy new micro 4/3” sensor camera – obviously you already need an adapter to convert the mount and flange distance (the expected distance between the lens and the camera). What if you put an optical element in that adapter as well to further converge the light? This, effectively, is what a focal reducing “speed booster” is doing:

metabones speed boster

Think back to when you were a kid playing with a magnifying glass: you’ll remember that converged light through the magnifying glass was warmer, right? The closer you move the magnifying glass to something (hopefully not an ant, you psychopath), the hotter it gets. The same thing (sortof) is at play in optics – converging the light available (formerly ‘wasted’) on the smaller sensor makes it, effectively, brighter. So it’s not changing anything fundamental about the limits of a lens, but is instead sortof ‘reclaiming’ otherwise wasted light the lens is converging for you.

So, there you have it – not a scam or magic, but capitalization on otherwise imperfectly adapted gear!

healthcare reading

I see that healthcare reform is in the news again! How exciting.

A few months ago I joked that there were two articles that were required reading before I discussed healthcare in the united states with anyone. I thought I’d flesh that out a little bit:

  • A good succinct no-frills timeline of how we got here. Do we have a government system? A private system? Why is the responsibility for healthcare placed on employers? Why is it called insurance when it covers not-unexpected things? If you don’t know the answer to any of these questions, read this.
  • This recent econtalk episode is a good, lengthier discussion of the above process. Christy Ford Chapin’s book is worth reading as well.
  • This summary of medical pricing and the AMA helps explain where and how costs are set in our current system. “Why is our healthcare so expensive?” is a difficult question, but this is one glaring part of the answer. (tl;dr: it’s a profiteering racket)
  • If you’ll allow some self-indulgence, this post by me, opining on obamacare (my optimism has since greatly diminished in the intervening 7 years), but in particular pointing out the difference between “health care” and “health insurance”, and lamenting the fact that in public debate, no one even bothers to make this lexical distinction.
  • Buy Health, Not Healthcare - a good framing of the situation by Robin Hanson in 1994.
  • A good thorough analysis of healthcare costs and the ramifications of various single-payer proposals by Megan McArdle.
  • Econtalk’s fascinating episode with Kevin Smith on the Surgery Center of Oklahoma and how most of the industry currently bills for procedures. (You might need to sit down for this one, parts of it are maddening).